 Save Pin
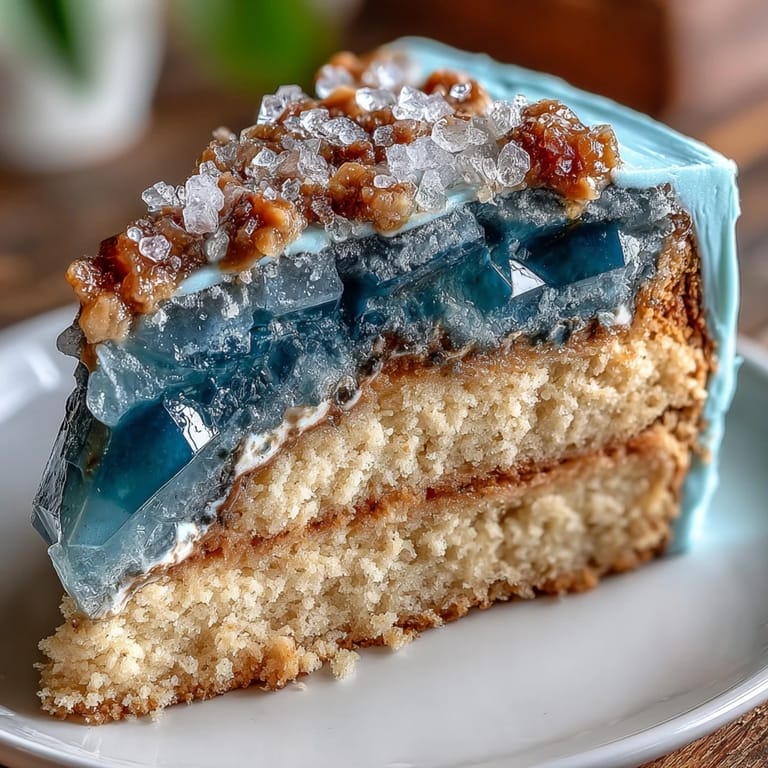
 The first time I attempted a graduation cake with a teal and gold geode slice design, my kitchen felt more like an artist’s studio than a bakery. Powdered sugar clouds drifted around my hands as I mixed buttercream, and I remember humming along to a playlist chosen specifically to keep up the celebratory mood. Midway through coloring the sugar crystals, their vibrant teal shade actually made me smile out loud—an unexpected pop against our usually muted countertops. Watching the gold luster dust swirl in a tiny dish of vodka had me feeling like a bit of a magician, prepping for a show-stopping reveal. This cake brings creativity, triumph, and just enough chaos to make any graduation feel truly memorable.
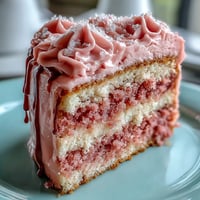
I made this cake last spring for my cousin's graduation party, and as the crowd gathered around the dessert table, even the shyest relatives leaned in to ask how the geode effect was done. Someone dropped a fork in awe, and it was the first dessert to vanish—faster than the brownies, which never happens in our family. The laughter and the bright teal fingers from sneaking bites before photos felt like a new celebratory tradition being born. The prep was hands-on and admittedly messy, but by the time the gold accents dried, we had collectively claimed it as the highlight of the evening. I still hear about it whenever graduation season rolls around.
Ingredients
- All-purpose flour: I've learned that sifting flour before measuring keeps the crumb extra light and prevents dry spots.
- Baking powder: This is what gives your cake layers that tall, tender rise—test freshness before use for best results.
- Salt: Even a tiny pinch sharpens the vanilla flavor and balances sweetness, so don’t skip it.
- Unsalted butter: Room temperature butter whips up fluffier with the sugar; any colder and you'll struggle for a smooth texture.
- Granulated sugar: Choose fine sugar for an even, delicate sweetness throughout the cake.
- Eggs: Room temperature eggs blend more easily, stopping any curdling in the batter.
- Vanilla extract: Real vanilla makes all the difference—especially when paired with gold accents for aroma.
- Whole milk: I've found that full-fat milk keeps the cake moist and rich, no matter how thick the buttercream topping.
- Powdered sugar: Sifted powdered sugar ensures buttercream is silk-smooth with no lumps.
- Heavy cream or milk: Help create the ideal spreadable buttercream; add a tablespoon at a time until just right.
- Teal gel food coloring: Gel color stays vibrant and won’t water down the buttercream; a little goes a long way.
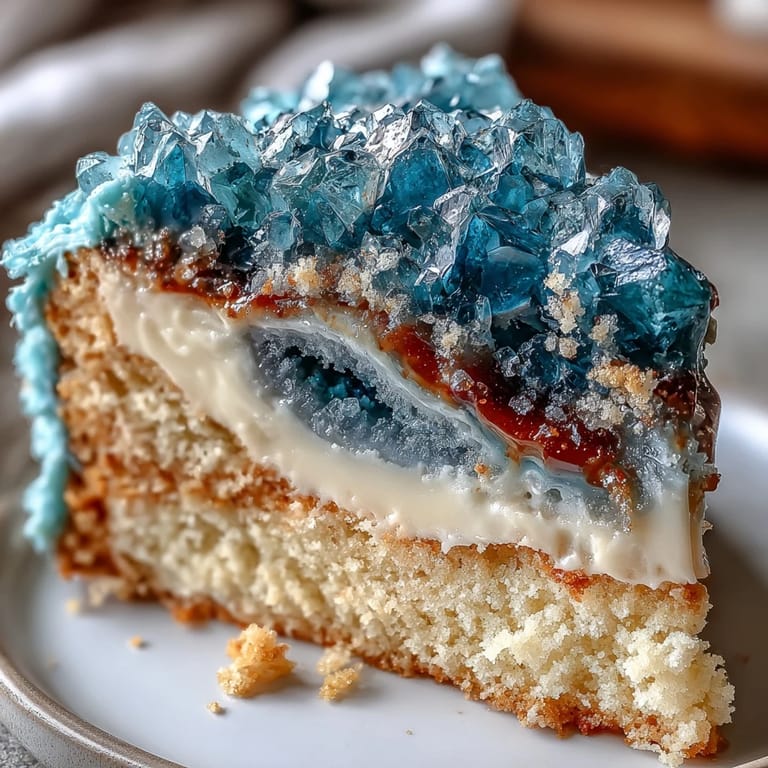
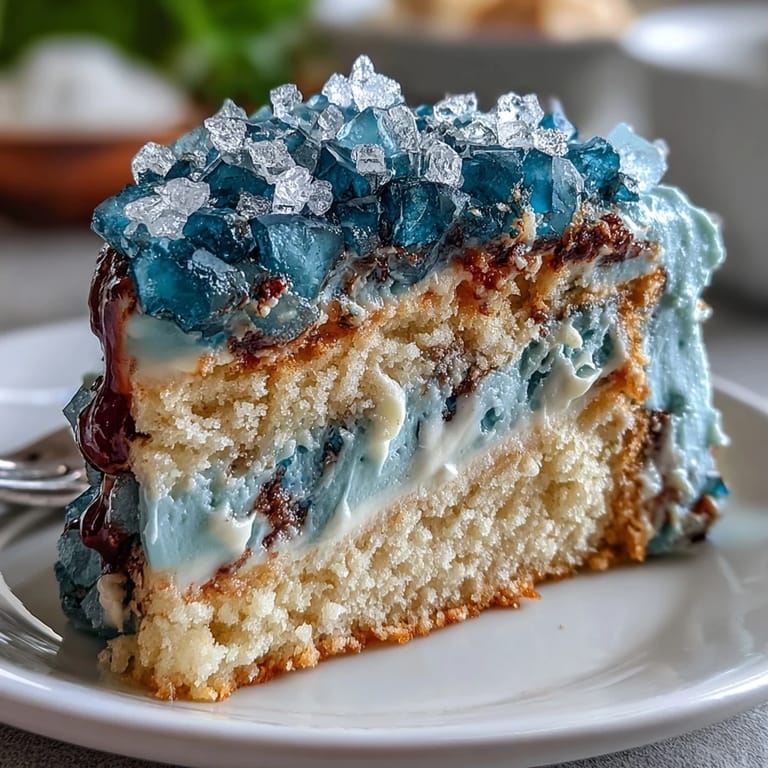
- Rock sugar crystals: These mimic geode texture—mix colors gently so you don’t crush the beautiful crystals.
- Edible gold leaf or luster dust: Gold touches bring drama and elegance; use a soft paintbrush for neat edges.
- Simple syrup (optional): Brushing cake layers with simple syrup is my trick to lock in extra moisture.
Tired of Takeout? 🥡
Get 10 meals you can make faster than delivery arrives. Seriously.
One email. No spam. Unsubscribe anytime.
Instructions
- Bake Vanilla Cake Layers:
- Preheat your oven and line three round cake pans, then whisk flour, baking powder, and salt together. Cream butter with sugar until fluffy before beating in eggs and vanilla, and then alternate adding dry ingredients and milk; divide the batter, bake, and let layers cool completely.
- Whip Up Buttercream:
- Beat unsalted butter till creamy, then gradually add sifted powdered sugar and vanilla. Add cream to reach spreadable consistency and tint most of the buttercream teal, keeping some plain for the crumb coat.
- Create Geode Sugar Crystals:
- Toss sugar crystals with teal gel food coloring and let them dry on parchment—be gentle so the crystals stay chunky for decorating.
- Assemble Cake:
- Level layers and brush with simple syrup if desired; stack cake with buttercream between, then apply a crumb coat and chill before frosting all over with teal buttercream.
- Carve Geode Slice and Decorate:
- Use a sharp knife to carve a wedge in the cake, slather inside with buttercream, then press colored sugar crystals into the cut for a geode look—paint the edges with gold for contrast.
- Add Finishing Touches:
- Embellish with more gold accents as you wish and place a graduation topper for flair.
 Save Pin
 The cake's sparkle caught the sunlight on the patio, making the gold shimmer like a trophy—a moment where the dessert truly matched the occasion. Everyone agreed it felt almost too beautiful to slice, but that first bite proved it was more than a centerpiece. To me, this cake became the definition of celebration: bold, sweet, and worthy of sharing.
Choosing Your Colors Makes All the Difference
The teal shade should feel fresh and vivid; mixing a touch of blue with your gel coloring can deepen the effect. Balance it against gold accents so neither color overwhelms the other. Layering lighter and darker sugar crystals is a trick I picked up after my first attempt looked flat in photos.
Decorating with Gold is Easier Than It Looks
Gold luster dust mixed with clear alcohol turns into paint that dries instantly. Practice brushing on parchment first so you get comfortable with the effect before aiming for the cake. Little touches of gold along jagged edges have the biggest impact—work slowly and step back to assess your masterpiece.
Assembly Tricks That Save Time and Stress
If your cake layers dome, trim them so they stack perfectly and your geode wedge sits straight. Using a chilled cake for carving holds shape better and makes decorating neat. Keep your offset spatula close to smooth buttercream edges and press crystals firmly so they stay put.
- Chill both cake and buttercream for half an hour before starting decoration.
- Use a serrated knife for cleaner cuts when carving the wedge.
- Clean up gold leaf spills quickly—they get everywhere!
 Save Pin
 Creating this graduation cake is as much about the fun and artistry as the flavor. Celebrate big, snap plenty of photos, and know that this cake will be remembered long after the party ends.
Recipe Help & FAQs
- → How is the geode effect created?
The geode effect uses colored sugar crystals pressed into buttercream in a carved cake wedge, then decorated with edible gold.
- → What flavor is the base cake?
The base is a light vanilla cake, enhanced by buttercream and optional flavor extracts for variation.
- → Can I use alternative color schemes?
Yes, blend teal and blue for dramatic geode crystals or customize sugar colors to suit your celebration theme.
- → Is this cake vegetarian?
Yes, all ingredients are vegetarian. Check sugar and food coloring brands for allergen information.
- → What tools are needed for assembly?
You’ll need an electric mixer, cake pans, offset spatula, serrated knife, mixing bowls, and a food-safe paintbrush.
- → How many servings does it make?
It yields approximately 16 servings, making it ideal for gatherings and special occasions.