 Save Pin
 My neighbor brought one of these to a block party last spring, and I watched the entire platter vanish in minutes. Everyone kept pulling off golden triangles from the ring, dipping and laughing, and I knew I had to figure out how she did it. When I finally made my own version, the kitchen smelled like toasted cheese and cumin, and my family circled the counter before I could even plate it. It's become my go-to whenever I need something that looks impressive but doesn't leave me stressed in the kitchen.
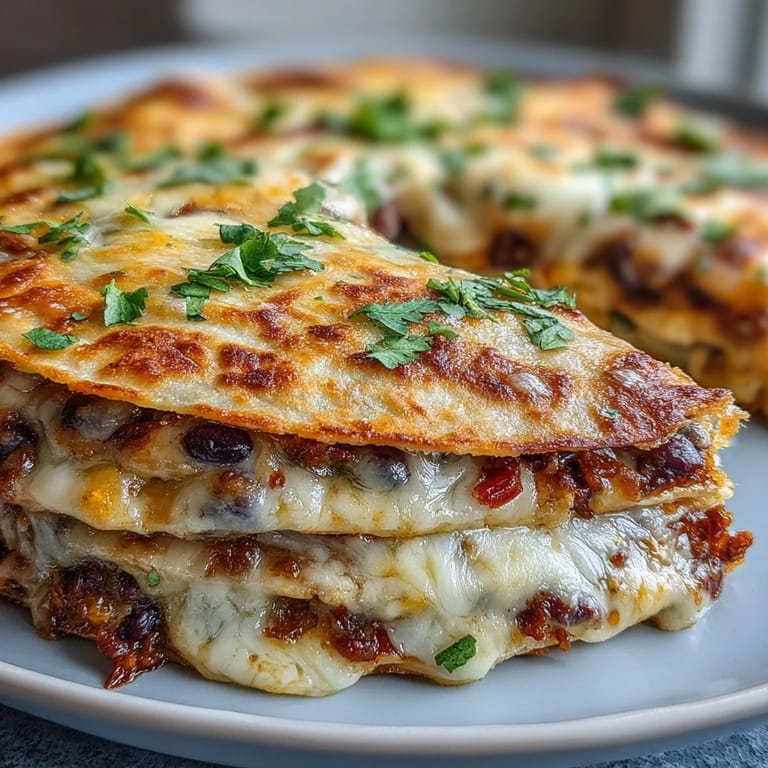
The first time I arranged the triangles into a ring, I wasn't sure they'd hold together in the oven. But as they baked, the cheese started bubbling between the folds, almost gluing them into one gorgeous, pull-apart wreath. My daughter called it a quesadilla flower, and the name stuck. Now she asks for it every time her friends come over, and I love watching them all lean in to grab a piece.
Ingredients
- Small flour tortillas: The 5 to 6 inch size is perfect for folding into triangles that fit snugly in the ring without gaps.
- Shredded cheddar cheese: It melts beautifully and adds a sharp, tangy flavor that balances the milder Monterey Jack.
- Shredded Monterey Jack cheese: This cheese melts smooth and creamy, creating that satisfying cheese pull everyone loves.
- Cooked black beans: They add heartiness and a slight earthiness, plus a pop of texture in every bite.
- Red bell pepper: Finely diced so it distributes evenly and adds a subtle sweetness and color contrast.
- Green onion: Thinly sliced for a mild, fresh bite that doesn't overpower the other flavors.
- Ground cumin: A warm, essential spice that gives the filling that unmistakable Mexican-inspired depth.
- Chili powder: Adds a gentle heat and smoky undertone without making it too spicy.
- Smoked paprika: This is the secret to a subtle smokiness that makes people ask what your special ingredient is.
- Unsalted butter: Melted and brushed on top, it helps the tortillas turn golden and crispy in the oven.
- Fresh cilantro: Chopped and sprinkled at the end for a burst of freshness and color.
- Prepared salsa: Use your favorite store-bought or homemade version for easy dipping.
- Sour cream: Cooling and tangy, it's the perfect contrast to the warm, cheesy quesadillas.
- Avocado: Sliced and optional, but it adds creaminess and makes the platter look even more inviting.
- Lime wedges: A squeeze of lime brightens everything and adds a zesty finish.
Tired of Takeout? 🥡
Get 10 meals you can make faster than delivery arrives. Seriously.
One email. No spam. Unsubscribe anytime.
Instructions
- Preheat and Prep:
- Set your oven to 400°F and line a large baking sheet with parchment paper. This keeps the quesadillas from sticking and makes cleanup a breeze.
- Mix the Filling:
- In a large bowl, combine both cheeses, black beans, bell pepper, green onion, cumin, chili powder, smoked paprika, salt, and pepper. Toss everything together until evenly distributed so every triangle gets a balanced bite.
- Cut the Tortillas:
- Use a sharp knife to cut each tortilla in half, creating 32 semicircles. Stack them as you go to keep them from drying out.
- Fill and Fold:
- Place a tablespoon of the cheese mixture on each semicircle, then fold the straight edge over the filling to form a triangle. Press gently along the edges to seal, but don't worry if a little cheese peeks out.
- Arrange the Ring:
- On your prepared baking sheet, arrange the triangles in a tight ring with the points facing inward and slightly overlapping. It should look like petals forming a flower, and the overlapping helps them hold together as they bake.
- Brush with Butter:
- Use a pastry brush to coat the tops with melted butter. This step is what gives you those crispy, golden edges.
- Bake Until Golden:
- Slide the sheet into the oven and bake for 18 to 20 minutes, watching for the tortillas to turn golden and the cheese to bubble. The smell will tell you when it's almost ready.
- Garnish:
- Carefully slide the ring onto a serving platter and sprinkle fresh cilantro over the top. The green adds a pop of color and freshness.
- Serve with Dips:
- Place small bowls of salsa, sour cream, and avocado slices in the center of the ring. Add lime wedges on the side and let everyone dig in while it's still warm.
 Save Pin
 One evening, I made this for a potluck and forgot to mention what it was. People kept asking if I'd ordered it from a restaurant, and I just smiled. When I finally admitted I'd baked it in my own oven, a few friends asked me to teach them. That's when I realized this recipe isn't just about the food, it's about the moment when something you made becomes the centerpiece of the whole gathering.
Customizing Your Filling
The beauty of this recipe is how flexible it is once you understand the base. I've swapped black beans for pinto, added shredded rotisserie chicken for extra protein, and even tucked in sautéed mushrooms when I wanted something earthier. My brother-in-law loves spicy food, so I once stirred in diced jalapeños and a pinch of cayenne, and he declared it the best version yet. Just keep the total filling amount roughly the same so the triangles fold and seal properly.
Serving and Presentation
Transferring the ring from the baking sheet to a platter can feel nerve-wracking the first time, but I've learned a trick. Slide a large flat spatula or even a pizza peel underneath the parchment paper and gently move the whole thing in one motion. Once it's on the platter, tuck your dipping bowls into the center, and suddenly it looks like something from a magazine. I like to add a few lime wedges around the edge and maybe some extra cilantro for color, and that's it.
Make-Ahead and Storage Tips
You can assemble the entire ring a few hours ahead, cover it with plastic wrap, and keep it in the fridge until you're ready to bake. Just add a minute or two to the baking time if it's going in cold. Leftovers can be stored in an airtight container in the fridge for up to two days, though they're best reheated in the oven at 350°F for about 10 minutes to crisp them back up. Microwaving works in a pinch, but you'll lose that golden crunch.
- If you're serving a crowd, make two rings and stagger the baking so one stays warm while the other is devoured.
- For a gluten-free version, use certified gluten-free tortillas and double-check all your cheese and spice labels.
- Don't skip the butter brush step, it's the secret to that irresistible crispy texture everyone raves about.
 Save Pin
 Every time I pull this out of the oven, I'm reminded that the best recipes are the ones that bring people together without stressing you out. It's cheesy, it's beautiful, and it disappears fast, which is exactly what a great appetizer should do.
Recipe Help & FAQs
- → Can I prepare the quesadilla ring ahead of time?
You can assemble the ring up to 2 hours in advance and refrigerate it covered. Brush with butter and bake just before serving for the best crispy texture.
- → What other fillings work well in this dish?
Try adding cooked shredded chicken, spicy chorizo, sautéed mushrooms, corn, jalapeños, or caramelized onions. Mix and match to create your favorite flavor combinations.
- → How do I prevent the quesadillas from falling apart?
Press the edges firmly to seal and arrange them tightly overlapping on the baking sheet. The melted cheese acts as a natural glue, holding everything together as it bakes.
- → Can I make this gluten-free?
Yes, simply substitute gluten-free tortillas for the flour tortillas. Check all other ingredient labels to ensure they're certified gluten-free if needed for strict dietary requirements.
- → What's the best way to reheat leftovers?
Reheat in a 350°F oven for 8-10 minutes to restore crispiness. Avoid microwaving as it will make the tortillas soggy rather than crispy.
- → How many quesadilla triangles does each person get?
With 32 triangles total and 8 servings, each person receives 4 quesadilla triangles, making this a satisfying appetizer portion for any gathering.