 Save Pin
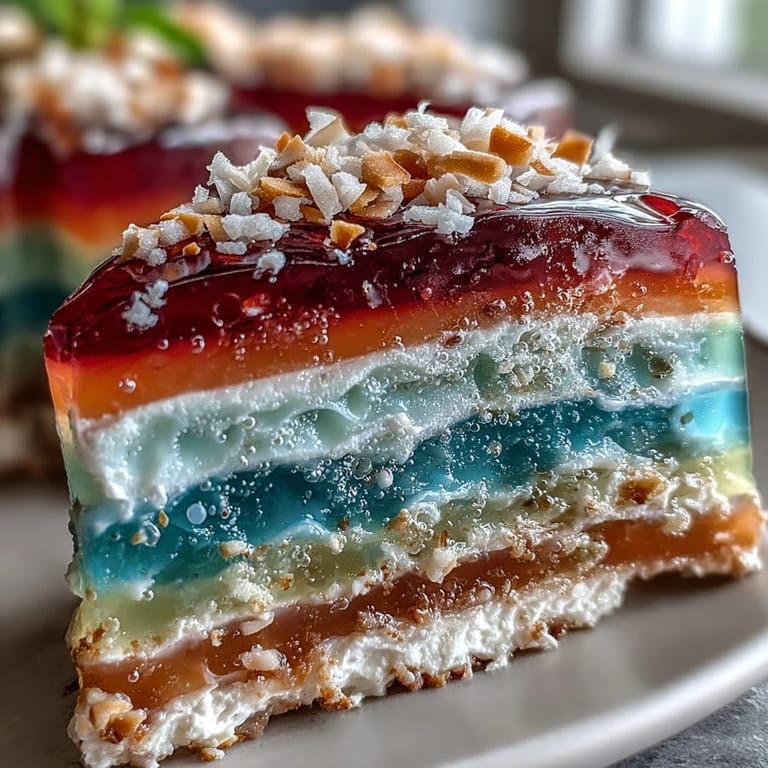
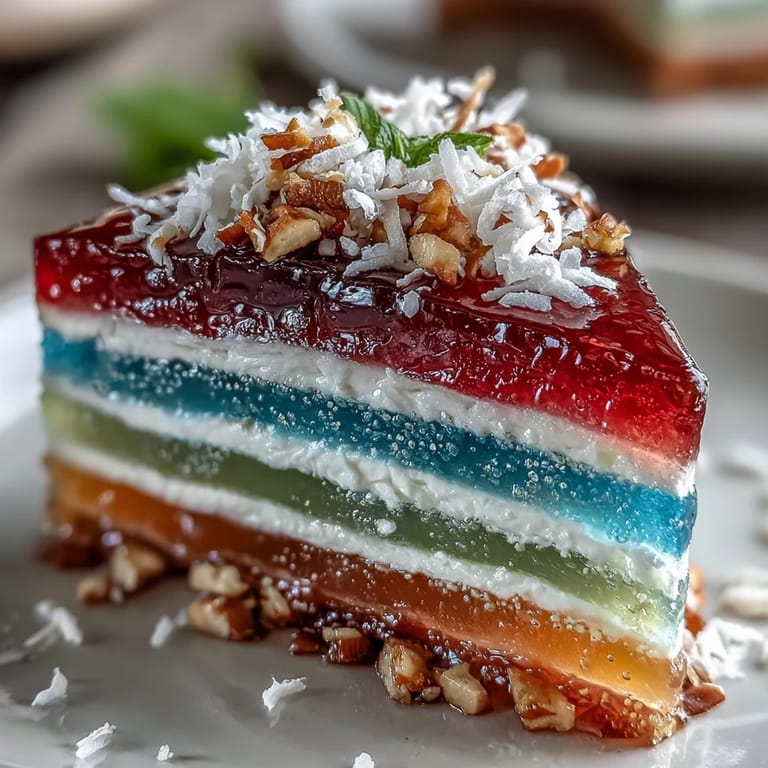
 The first time I made an Agar-Agar Rainbow Jelly Cake, the kitchen was alive with laughter and bursts of color, my hands stained faintly blue and red from the food coloring. The humming of the refrigerator reminded me to be patient with each layer, but my curiosity made me sneak peeks every few minutes. There's a wild sense of anticipation as ribbons of jelly stack atop each other, glossy and bright. I remember the gentle scent of coconut wafting through the air and my friend’s delighted gasp seeing the jelly cross-section for the first time. It’s a dessert that feels like a little celebration every time you unmold it.
Last summer, I brought this cake to a picnic and watched as kids argued (politely) over who got the biggest slice of purple. The sun made the colors glow like stained glass, and the coconut cream layer stayed cool and velvety even after an hour outside. Passing around sticky forks and giggling at jiggly jelly ‘races’ instantly made it the MVP of the dessert table.
Ingredients
- Agar-agar powder: Essential for that signature jiggle. I’ve found sifting it in slowly prevents clumps and gives a glass-like finish.
- Granulated sugar: Go with the full amount for sparkle and a pleasant sweetness throughout—skimping can make the jelly bland.
- Vanilla extract: Just a little softens the sweetness and perfumes the layers. Try adding it off the heat to keep the flavor strong.
- Gel food coloring: The more vibrant, the better! Gel colors don’t dilute the liquid and stay true when chilled.
- Fruit juice (optional): Pops of pineapple or grape juice add a natural twist—just remember to match the color to the flavor.
- Coconut milk (full-fat): The creamy top layer makes this cake feel luscious and tropical. I always use full-fat for the richest taste.
- Salt: A pinch in the coconut cream brings out the flavors—you’ll notice if it’s missing!
Tired of Takeout? 🥡
Get 10 meals you can make faster than delivery arrives. Seriously.
One email. No spam. Unsubscribe anytime.
Instructions
- Get the Jelly Base Bubbling:
- Pour water and agar-agar powder into a large saucepan. Stirring constantly, bring it up to a gentle boil; you’ll see the powder dissolve and the liquid turn slightly translucent.
- Sweeten and Scent:
- Add the sugar and keep stirring until it’s absolutely clear—no graininess left behind. Take off the heat and stir in the vanilla, inhaling that familiar, cozy aroma.
- Divide and Color:
- Quickly pour the hot jelly into six bowls kept over warm water. Drop the food colors in, swirling until bold hues appear, and add fruit juice if you want extra zing.
- Layer Up:
- Pour the first colored jelly into your pan. Slide it into the fridge for about 10 minutes—poke the top gently, and if it doesn’t stick, you’re ready for the next color; repeat the process layer by layer, enjoying the reveal each time.
- Mix the Coconut Cream:
- In a separate saucepan, whisk the coconut milk, agar-agar, sugar, and salt. Let it bubble gently until completely smooth, then cool for a few minutes while you marvel at how creamy it looks.
- Finish with Creamy Top:
- Carefully pour the coconut layer over your finished jelly stack. Pop it in the fridge to set for at least two hours—the hardest part is waiting.
- Slice and Celebrate:
- Run a thin knife around the chilled cake and flip it onto a plate. Each slice reveals a spectacular rainbow, ready to be devoured cold.
 Save Pin
 I’ll never forget the surprised smile on my aunt’s face when she tasted the cake after years of avoiding ‘jelly desserts’—she went back for seconds, won over by the creamy coconut finish and playful colors. It’s those moments, when a recipe changes someone’s mind, that make all the stirring and layering worthwhile.
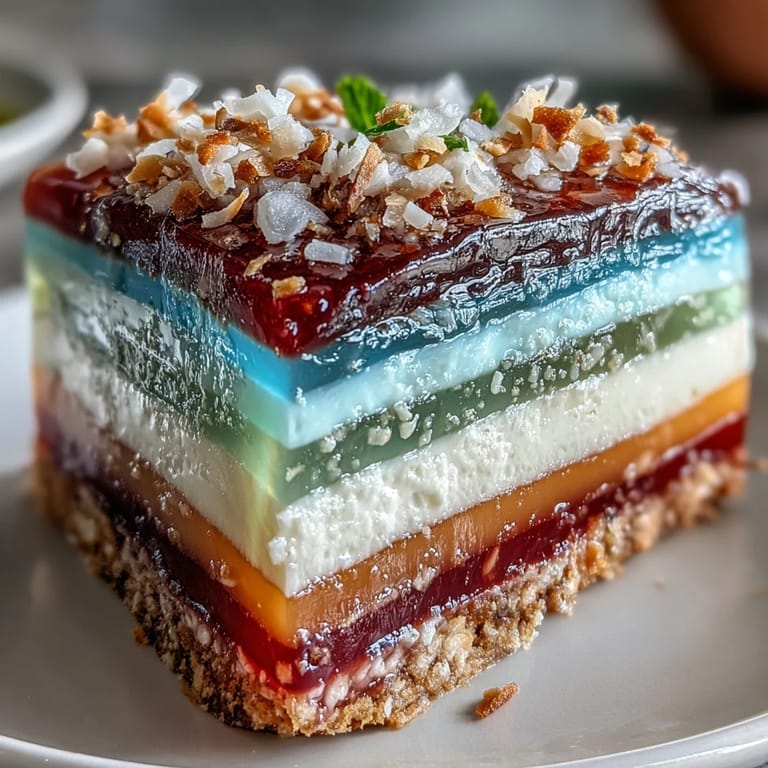
Avoiding Layer Mishaps
One evening, I got distracted and let a colored layer set too firmly—when I poured the next, they slipped apart like toy blocks. I learned to check for just-set tops, not longer, and brush very lightly with a fork to ‘roughen’ the surface for extra grip. Paying attention to timing keeps those rainbow bands perfectly stacked every time.
Small Tweaks for Big Flavor
Substituting a splash of lychee or passionfruit juice into a layer changes the personality of the cake in the most delightful way. I sometimes tuck in diced mango between two colors for a surprise bite, or use pandan essence to flavor the green layer. Playing with flavors keeps each jelly cake unique, especially for gatherings where everyone likes something different.
Finishing Touches That Impress
The glass-like finish can pick up fingerprints fast, so unmold the cake just before serving and handle with a piece of wax paper. Try slicing with a hot, damp knife for sharp, clean edges—each cut becomes a mini rainbow window. Chilling the serving plates keeps slices perfectly firm, even on hot days.
- Line the pan with plastic wrap for easy unmolding if you’re nervous.
- Decorate the top with edible flowers or citrus zest for a festive look.
- Remember, the cake tastes just as joyful with a few wobbles or quirks.
 Save Pin
 This rainbow jelly cake always brings a sense of accomplishment and playfulness to the table. Enjoy every colorful slice and the stories that come with it.
Recipe Help & FAQs
- → How do I ensure agar-agar fully dissolves?
Bring the agar-agar and water to a rolling boil while stirring constantly, then simmer 2–3 minutes until fully dissolved. Small clumps can remain if not stirred thoroughly, so whisk well and keep the mixture hot until dividing.
- → Can I flavor the colored layers with juice?
Yes. Add up to 1/2 cup of fruit juice per color for natural flavor, but reduce added sugar if the juice is sweet. Strain pulpy juices to keep layers clear and bright.
- → How do I prevent colors from bleeding between layers?
Chill each layer until just set (surface not sticky), typically 10–12 minutes in a refrigerator. Pour subsequent layers gently and avoid hot liquid contact with the layer beneath; keep bowls warm only enough to prevent setting before coloring.
- → What is the best way to get a smooth coconut cream top?
Make the coconut layer by heating full-fat coconut milk with a small amount of agar and sugar, simmer until dissolved, then cool 3–5 minutes before pouring gently over the final set layer so it spreads evenly without melting the colors below.
- → How do I slice neat, even pieces?
Loosen edges with a thin knife and invert onto a plate. For clean slices, warm a long knife under hot water, dry it, then slice in a single downward motion, wiping the blade between cuts.
- → How long will this keep in the fridge?
Store covered in the refrigerator for up to 3–4 days. Keep chilled to maintain texture; avoid freezing, which can change the jelly’s structure and make the coconut layer grainy.